Canning Vegetables Guide
Ever wonder how your grandma produced the most perfect pickles or always had tomatoes on hand even in the dead of winter?
Canning vegetables revolutionized preservation techniques just over a century ago, and boy are we grateful! The history of canning vegetables didn’t quite start with the Ball brothers and their now classic mason jars, but when choosing to can at home we wouldn’t consider anything else. The glass mason jar, sealing lid, and secure band make canning vegetables at home just as easy as when Mr. Mason invented the sealing lid himself.
Canning vegetables allows you to enjoy summer and early autumn produce, we all crave and love, year round. Saving those candy tomatoes for a summer sauce in December ensures a pleased palate and surprised dinner guests, thinking you’ve defied the laws of nature. Secret high tech greenhouse in the back? Nope! Just good ‘ole fashion canning in the kitchen.
Now let’s get down to the nitty gritty and go over the basics of canning vegetables.
Canning 101
- Bring a large pot of water to a rolling boil for sterilizing the jars.
- Add jars and lids and process for at least 5 minutes. No need to add the bands, simply wash those with warm soap and water.
- Remove jars after 5 minutes. Cover the pot with a lid to keep the water hot and prevent over-evaporation.
- Add hot contents to hot jars. High acid foods will need to be hot when added to a hot jar. We will only be using this technique, also referred to as hot packing.
- Once the jar is packed, lidded, and lightly secured with a band, add back to the boiling water and process for however long the recipe suggests.
- Once removed, let the jars cool for up to 10 hours. Check periodically to make sure the seal was successful. Press in the center of the lid. If it does not push down then it is sealed and good to sit for months in a cool, dark place. If it pushes down and springs back up then it is not properly sealed and needs to be eaten or reprocessed promptly. Canning vegetables is much easier than we all thought!
Here is a canning vegetables guide from Ball, the OG for all your canning needs.
Now that you’ve got the technique for canning vegetables down pat, you’re ready for some real action.
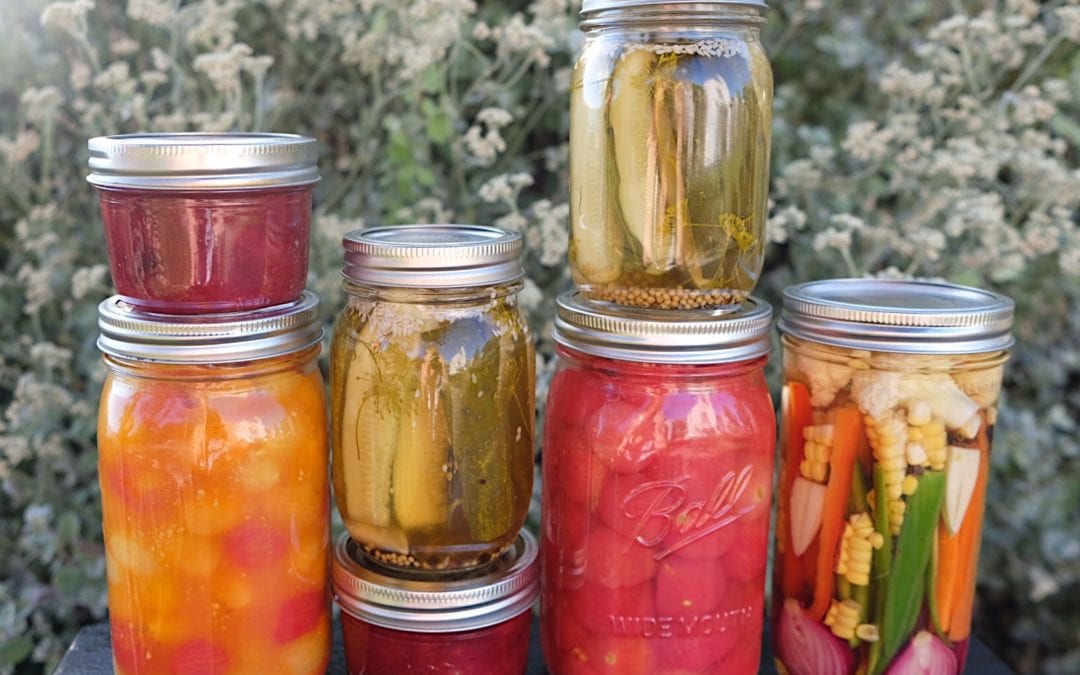
We’ve laid out a few traditional canning recipes and a few that you haven’t thought about. Keep reading for classic canned tomatoes, Dill Pickles, California Giardiniera Vegetables, and a Rhubarb Pluot Conserve. Maintain your drooling saliva, please.

Canning Tomatoes
Tomatoes offer a sensationally sweet, acidic pop to any dish. Canning tomatoes allows for this vibrant summer produce to be devoured any day your heart desires.
When choosing tomatoes, we suggest making a trip to the farmers market. Vendors will have a shocking variety for canning tomatoes and for snacking/taste testing, of course. Though be sure to ask if you can taste before you touch! For our canning project, we’ve used a mix of different organic grape tomatoes ranging from bright yellow to “cherry” red in addition to a batch of pink heirlooms.
Typically, Roma and San Marziano tomatoes are the best for canning vegetables due to their thick meaty flesh, minimal juice, and high acid content, but we’d like you to think when it comes to canning tomatoes that the world is your oyster. Choose your favorite kind of tomato since you’re the one who will be chowing them down. Any high or low acid tomatoes will work for this method, just be sure that the tomatoes are not overly ripe as this will result in an inferior canned product. We are looking for firm, perfectly ripe, and full colored tomatoes.
When making sauces or cooking down tomatoes in general, the skins always seem to take away from the flavor bomb inside. Tossing the unwelcomed, rubbery sheets around your tongue, fighting for the real gold hidden inside always leaves one to wonder, “how do I avoid these pesky skins”? With a few extra steps listed below and a touch of patience, cherry tomatoes will be preserved just the way you’ve always dreamed.
As far as cooking goes, canned tomatoes are best for sauce making. In the glass jars, they’ve sweltered in their own juices and been processed to maintain their sweet, acidic balance.
And without the skins present, your tastebuds can focus on flavor instead of unwanted texture. Canning tomatoes offers the perfect substitute for fresh tomatoes in any of these sauce recipes. For our sake of using peak cherry tomatoes, here are some recipe ideas that can be used as a guide for cooking up your home-canned tomatoes.
If you decide to take on the project of canning tomatoes, use whatever inventory you already have in your fridge and go ahead! The measurements are easy to tweak. For every 1 pint of tomatoes of your choosing, add 1 tbsp of lemon juice, 1 tsp sugar, and 1 tsp of salt. We’ll leave the math specifics up to you, your tomato stash, and whichever jar sizes you have laying around.
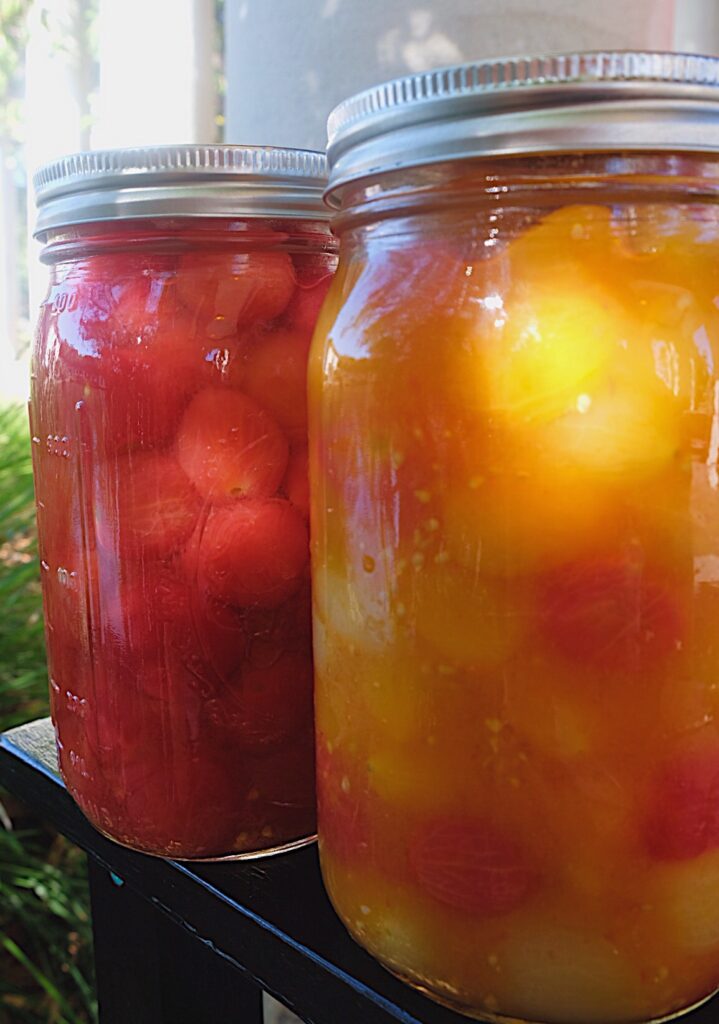
Canned Tomatoes (makes two 32 oz jars)
- 6 pints grape tomatoes
- 6 tbsp lemon juice
- 6 tsp sugar
- 6 tsp kosher salt
Process in a hot water bath, 35 minutes for a pint and 45 minutes for a quart.
Bring a large pot of water to a rolling boil.
Rid of the tomato skins with the following procedure:
Score an x on the non-stem end of the tomatoes. No need to cut very deep, just enough to puncture the skin. Carefully add the tomatoes to the water for about 20-30 seconds. When you start to see the skins pull away from the meat of the tomato, they should be good to go.
Using a slotted spoon or spyder, remove the tomatoes and plop them into a bowl of ice water. This halts the cooking process and keeps your tomatoes from becoming mealy. Once cool enough to handle, peel the skin off the tomatoes. Voila! You’ve learned a classic French technique called “tomato concasse”.
Next, add the tomatoes to a different pot and bring to a hard boil. Skim off any scum that rises to the surface.
The scum is the result of any last impurities being released from the tomatoes. Ridding of the scum will leave you with a pure, uncompromised canned product.
Once the tomatoes are cooked through and begin to release their tasty juices, after about 3 minutes, they are ready to be canned.
Add the lemon juice, sugar, and salt to each jar (amounts per pint listed above).
Being careful not to splash the hot juices, fill each jar with the tomatoes, leaving ½ inch of space at the top. Use a chopstick or end of a wooden spoon to tap around and remove air bubbles. Cap with lid and band. Tighten as hard as you can, then loosen it. The seal needs a little wiggle room to do its thing.
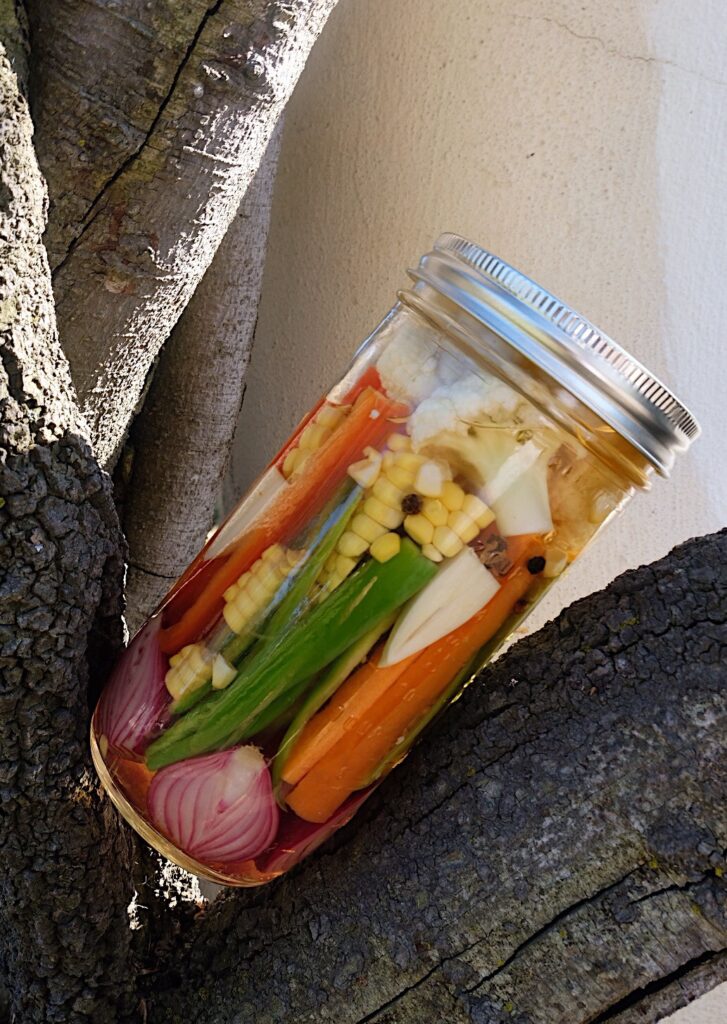
Canned San Francisco Giardiniera Vegetables
Giardiniera is a pickled concoction of garden vegetables. The word giardiniera comes from the italian word giardino meaning garden AKA the best way to preserve the garden surplus from your late summer/early autumn abundance. This pickled veg medley can be added to antipasto platters, ham and roast beef sandwiches, chopped in with some mayo to be added to chicken salad, topped on pizza, or even garnished on a quick stir fry for an added acidic pop. The choice is yours! Having this mixture on hand is a gamechanger when you need to pump up the acid; the hero on hand, if you will.
The Chicago style giardiniera is similar but different- small diced vegetables are fermented and then added to vinegar to be canned. Here we’ve taken a short cut by eliminating the fermentation portion and instead gone for an overnight brine then straight for the pickle. Feel free to use a variety of produce for canning vegetables, as we have matched some classic components with what was lookin’ mighty fine at the farmers market in San Francisco.
San Francisco Giardiniera Vegetables (makes one 24 oz jar)
- 1 red pepper, sliced into stalks
- 1 carrot, sliced into stalks
- ¼ head cauliflower, cut into small florets
- 5 okra, quartered
- 2 serrano peppers, sliced
- 3 red pearl onions, cut in half
- ½ ear of corn, cut into pads
- 2 tbsp salt
- Water
- 3 cloves of garlic, cut in half
- ½ cup white wine vinegar
- ½ cup apple cider vinegar
- 1 cup water
- ½ tsp black peppercorns
- 1 bay leaf
- ¼ tsp dried oregano
- 2 tbsp sugar
- 1 tbsp kosher salt
- Olive oil
Prep all of your veggies and add to one bowl. Cover with salt and necessary water so that all of the vegetables are completely submerged. Brine in refrigerator for 24 hours.
The next day, arrange vegetables in the jars as you see fit (we went for the most aesthetically pleasing arrangement). Set aside.
Combine vinegar, water, peppercorns, bay leaf, oregano, sugar, and salt in a small pot. Bring to a light simmer until the sugar and salt dissolve.
Pour the vinegar/water into the jars leaving about ¾ inch of space. Top with ¼ inch of olive oil, still leaving ½ inch of space between the liquid and the lid.
Use a chopstick or end of a wooden spoon to tap around to remove air bubbles.
Put on the lid and then the band. Tighten as hard as you can, then loosen it. The seal needs a little wiggle room to do its thing.
Process in a hot water bath for 10 minutes.
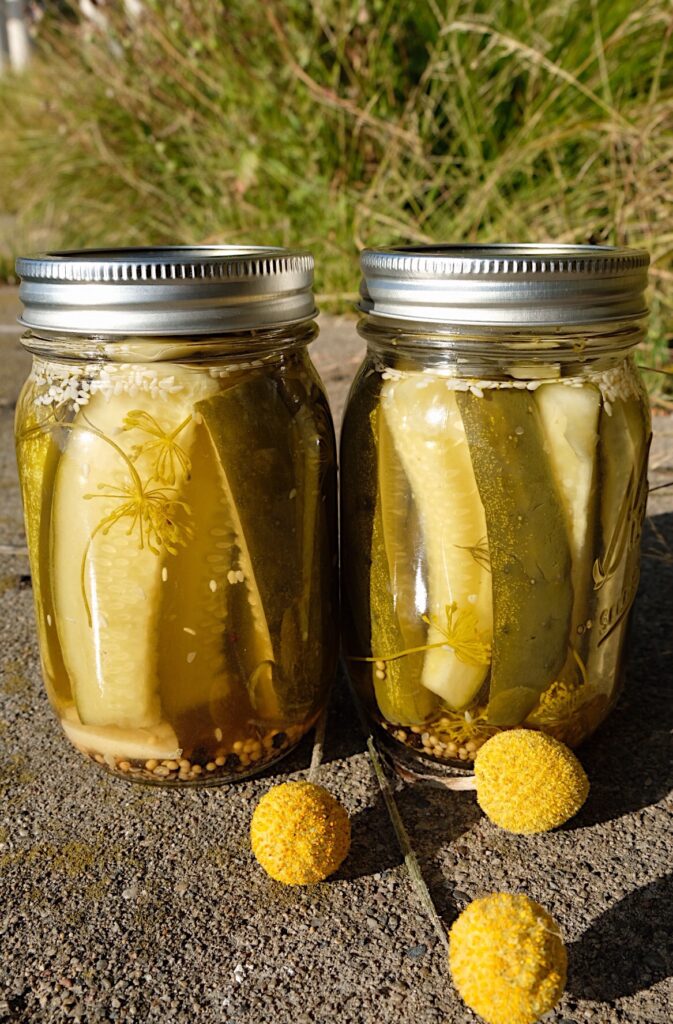
Canned Dill Pickles
Nothing says fun like a pickling party, amirite? And the first thing most people think of when it comes to pickles is, you guessed it, classic dill pickles.
While cucumbers are technically a fruit, for the sake of canning vegetables we’ll call these pickles a welcomed guest to the veggie party!
Dill pickles are a classic accoutrement to deli sandwiches, cheese boards, bloody marys, relishes, cubanos, egg salad, and on and on. Truly the one thing we always have at least 2 or 3 backups of on standby, always ready to fight with the lid for that juicy crunch or satisfaction.
Slice up the pickles and snack with Wheat Thins and muenster cheese. May sound a little off-kilter, but you’ll thank us when you add the triage to your next picnic. Use the brine in vodka cocktails for a flashback taste of college when you ran out of every other chaser and there was still vodka to get down the hatch. Never thought canning vegetables would speak to your party days, did yah?!
When choosing cucumbers for pickling, we suggest kirby/pickling cucumbers. Kirbies have low water content, thin skin, and hold their shape and crunch after sitting in an acidic solution over time, making them the perfect pickling specimen. The cucumbers should be firm, with a bit of weight to them, perfectly ripe-green, without any bruising or soft spots before pickling. Gotta maintain that fresh chomp!
Our recipe is the ideal balance of sweet, tang, salt, and flavor bursts. Pucker up baby, you’re in for quite the pickle.
Dill Pickles (makes one 12 oz jar)
- 6-7 kirby/pickling cucumbers
- 1 garlic clove, cut in half
- 1 head of dill weed flowers
- ¼ tsp sesame seeds
- ½ cup water
- ½ cup white vinegar
- 1 ½ tbsp kosher salt
- 5 tbsp sugar
- ½ tsp mustard seeds
- ⅛ tsp black peppercorns
- ½ bay leaf
Process in a hot water bath for 10 minutes.
Cut off the ends of the cucumbers. The ends carry an enzyme that promotes softening; let’s avoid that. Cut into quarters, the ‘hotdog’ way just to clarify.
Add cucumbers, garlic, dill weed, and sesame seeds to jar. Set aside.
In a small pot, add water, vinegar, salt, sugar, mustard seeds, peppercorns, and bay leaf. Bring to a light simmer and stir until salt and sugar dissolve.
Using a funnel, pour hot brine into a warm, sterilized jar leaving ½ inch of space at the top.
Cap with lid and band. Tighten as hard as you can, then loosen it. The seal needs a little wiggle room to do its thing.
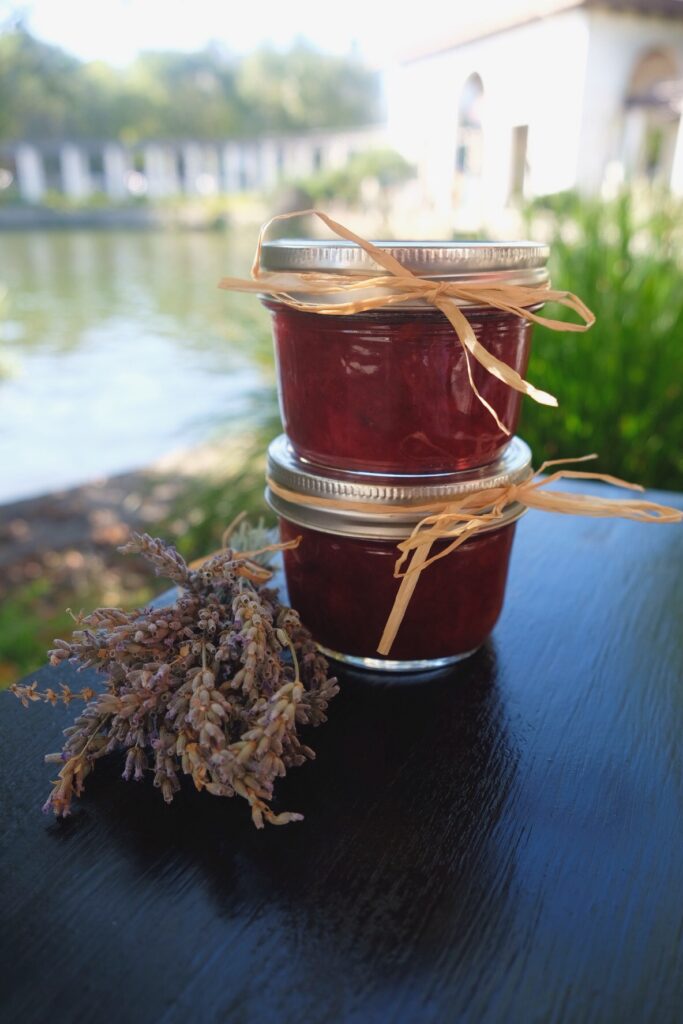
Rhubarb Pluot Conserve
Rhubarb may typically be paired with sweeter fruits to balance its sour tang, but it is indeed a vegetable! Classifying canning vegetables is getting a bit harder than you thought, and now we’ve confused you even more 🙂
Stone fruits and the royal rhubarb are inching their way out of season, waving adios until they treat our bellies again next year. Grab what’s left on the table and let’s save it for winter, shall we?
Rhubarb grows in stalks and is known for its face-pinching tartness. You’ve probably seen it most often in strawberry rhubarb pie, which is why we wanted to give that combo a run for its money.
Pluots are a newer generation hybrid between plums and apricots. From Plumagranite and Black Splendor, to Emerald Blush and Tropical Plumana, there is definitely not a shortage of pluot, cross bred varietals. We chose Crimson Sweet for their sweet flesh to balance the tartness of the rhubarb. The skins of pluots tend to lean on the sour side, but Crimson Sweet’s skins just work with the tart rhubarb, don’t worry. The raisins help mellow out the sour as well.
Now for a vocabulary lesson. Who knows the difference between jam, jelly, preserves, butter, conserves, and marmalade? Most don’t, so hopefully this will clear things up! To clarify for this recipe, a conserve is a jam-like byproduct from cooking two or more fruits down with sugar and the addition of either nuts or raisins. Voila!
Didn’t know you be so educated about canning vegetables after reading this, did yah?!
Rhubarb Pluot Conserve (makes two 8 oz jars)
- 2 stalks of rhubarb, medium dice
- 10 Crimson Sweet pluots, pits removed
- ¾ cup sugar
- ¼ cup water
- 3 whole cloves
- 1 cardamom pod
- 1 pinch of cinnamon
- 1 even smaller pinch of kosher salt
- ¼ cup golden raisins
Cut up rhubarb then cut up pluots, being sure to remove the pits. Reserve a cup of cut pluots.
Using a tea infuser or cheesecloth and twine, combine cloves and cardamom.
Add rhubarb, pluots, sugar, water, contained whole spices, cinnamon, and salt to a medium pot. Cook on medium/high heat for 15-20 minutes until the contents break down to a jammy consistency. Check for sweet/sour levels- everyone’s palate is different, adjust as needed.
Toss in the golden raisins and reserved fruit. This ensures some chunks of fruit as opposed to 100% mush texture. Lower heat and cook another 5 minutes.
Using a small ladle, and funnel if needed, add preserves to the hot, sterilized jars. Use a chopstick or end of a wooden spoon to tap around and remove air bubbles.
Top with lid and band. Tighten as hard as you can, then loosen it. The seal needs a little wiggle room to do its thing.
Process in a hot water bath for 15 minutes.
Canning vegetables brings the joy of your summer favorites when the fridge offerings are looking bleak.
Once you have the canning basics down, you can start playing with ratios and ingredients. Be sure to take notes when you crack a jar open; listen to your taste buds and write whatever sings back. That way, if you want to make it again you’ll know it needs more salt, spices, what have you. It’s all about being mindful of what you like.
Canning vegetables takes a few set of hands if you’re going to blow through some serious product. An easy way to preserve as much as possible in a reasonable amount of time? Have yourself a canning soirée! Everyone brings their own jars, somebody provides spices, somebody brings the produce, and you provide the cocktails (pickle martini anyone?)
Time to get hands on in the kitchen with some groovy tunes and friends; we guarantee a night of giggles, many clinks, and a whole ‘lotta pickled nibbles for your next round up.
~Created and written by Chandler Henry