Halloween desserts are here for a bloody good time!
Boo! Did fall sneak up on you too? The autumn equinox has passed, the leaves turn to rust and gold, and pumpkin spiced everything makes way to all menus out there- it’s time for the sweet treats of fall. Halloween desserts are here for a bloody good time. Let’s creep it real this season with all kinds of pumpkin Halloween desserts.
Heading to a Halloween party and need to bring along a fun dessert? Look no further, we have the plan. From easy Halloween themed Mendiants to a many-stepped Chai Pumpkin Pie, we’ve got you covered if you have 10 minutes or 10 hours. Read along for this season’s best Halloween desserts.
Pumpkin Cheesecake with Coconut Walnut Frosting
Cheesecake, forever the most decadent dessert at the party. Saved for special occasions or guiltily savored as a weeknight delight. The creamy texture matched with a crisp crust would send anybody overboard for just a crumb.
For the Halloween dessert version, we’ve flavored the cheesecake with pumpkin, pinched in a touch of fall spice, and poured it over a rich graham cracker, brown butter crust.
To send you over the edge, it’s topped with the most insane frosting you’ve ever had. Coconut, walnuts, maple syrup, and bourbon take on the pumpkin notes in the cheesecake and, oh my gourd, it’ll send you swooning.
Don’t get the baking scaries, cheesecake is simple. You’ll do great, witches honor.
Cheesecake Crust Recipe
- 2 packages of Honey Maid Graham Crackers
- 4-5 tbsp butter
- Pinch of Cinnamon
Start the batter!
Preheat your oven to 350° F. Prepare your 9 inch spring-form pan by wiping with butter or a neutral oil, such as sunflower oil. Or spray with cooking spray. Whatever you’ve got will do for the most part, except EVOO or anything seasoned, as this will lend flavor to the final product. Set aside.
In a food processor, grind the HoneyMaid graham crackers into fine powder. Set aside.
Melt the butter in a small saucepan on medium heat. Keep a close eye on this, butter can turn easily. We’re looking for the butter solids to float to the top and brown just a touch. This will inevitably relay a richer flavor to the crust of the cheesecake.
Massage the graham grind with the warm butter until you can squeeze up a ball and it sticks. You want a sturdy crust to stand up against the weight and creaminess of the cheesecake batter.
Taste it. It will make you drool over it’s full flavored crumb. And the is only step one..
Press the crumb into the buttered/oiled 9-inch spring-form pan in an even layer.
Pumpkin Cheesecake Recipe
- 32 oz Cream Cheese (four 8 oz boxes)
- 4 Large Eggs
- 1 cup White Sugar
- 1 tsp Vanilla Extract
- 1/4 tsp Nutmeg
- ¼ tsp Cinnamon
- ¼ tsp Salt
- Leave cream cheese out of the fridge on the counter for at least 24 hours. This will allow the cream cheese to come to room temperature and result in an extra creamy texture, preventing any cold clumps of cream cheese from forming in the batter. Aiming for a consistent texture throughout the cheesecake.
- Preheat oven to 350°F
- Using a hand mixer, whip the eggs and sugar in a large bowl.
- Add room temp cream cheese and continue to mix until combined, then add in vanilla, nutmeg, cinnamon, and salt.
- Taste! Make sure it’s not too much spice for you. Or maybe it’s not enough. You do you boo.
- Pour the batter over the greased and crust-bottomed pan in an even layer.
- Pop it in the 350°F oven for 45 minutes and check in.
- When you see a golden top rise from the orange goop you just mixed, it’s a good sign my friend. Let it cool and do the jiggle test. It should be firm, golden, and noticeably taller. If you see a crack on the surface, it’s more than ready.
- While the cheesecake is cooking, feel free to get a head start on the frosting; the best part is yet to come for this Halloween dessert!
Coconut Walnut Maple Bourbon Frosting Recipe
- 1 12 oz can Evaporated Milk
- ¾ cup Butter
- 2/4 cup Sugar
- ½ cup Light Brown Sugar
- 5 Egg Yolks
- 2 cups Shredded Coconut
- 2 cups Walnuts, toasted and chopped
- 1 tsp Vanilla
- 2 tbsp Maple Syrup
- 1 tsp Bourbon
- In a medium sized pot, whisk the evaporated milk, butter, both sugars, and egg yolks over medium-high heat.
- Bring to a simmer and reduce flame. Continue stirring for ~20 minutes, until the frosting thickens to a pudding like texture.
- Stir in coconut, walnuts, vanilla, maple syrup, and bourbon.
- Let cool for 45 minutes. If you don’t taste it before then, you’re doing it wrong!
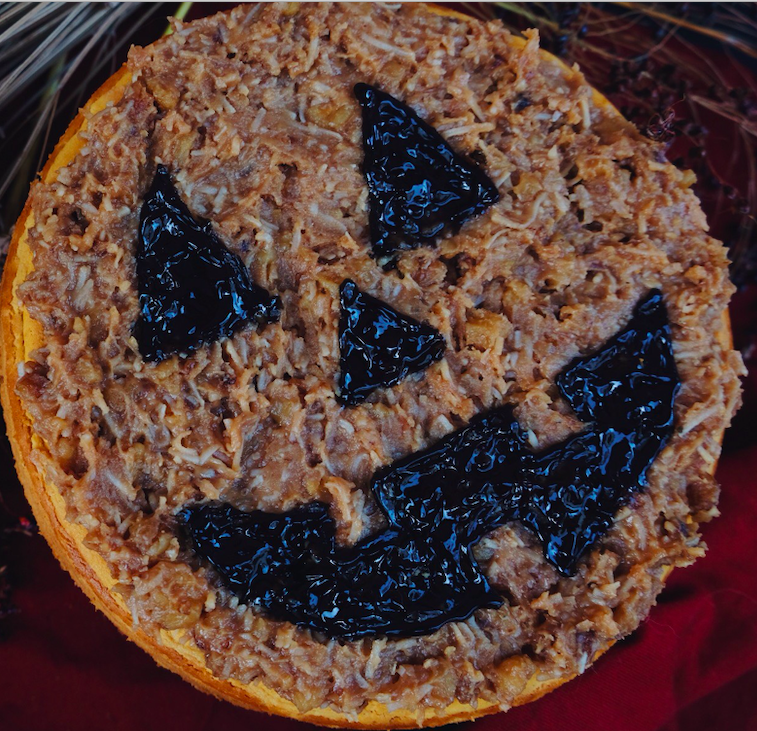
- Spread on top of cheesecake or dollop onto each slice. If you’re in the Halloween dessert spirit, try drawing a jack o’ lantern face on top, a witches broom and bats, or douse with sprinkles. Get creative with it!
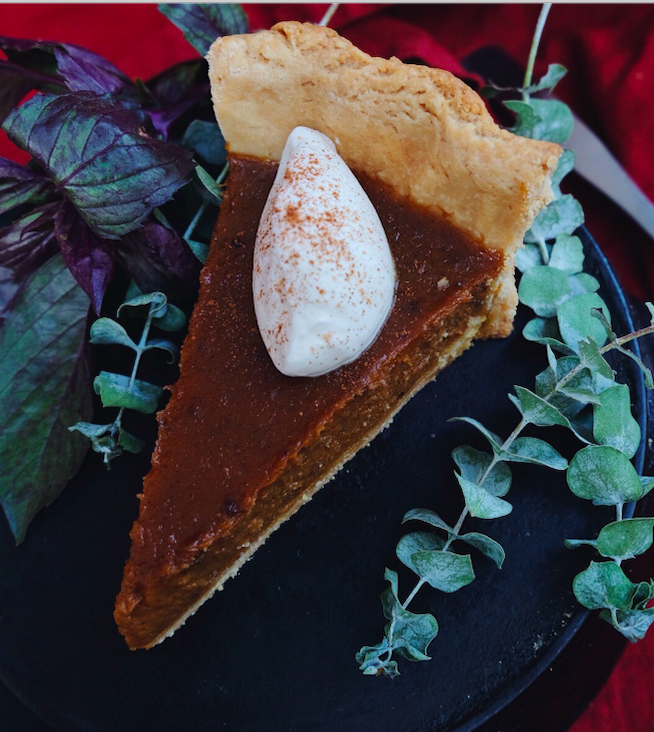
Chai Spiced Pumpkin Pie with Maple Whipped Cream
What’s fall without pumpkin pie? Soulless, that’s what! It wouldn’t be October without many cans of Libby’s Pumpkin. While roasting your own pumpkin for Halloween desserts and saving the seeds for snacking sounds like a wonderful idea, and it still is, there is just something about a dependable can of Libby’s pumpkin that you just can’t beat (baking pun intended). Baking with homemade pumpkin pureé seems to never lend the expected end result. Libby’s for life! The chai spiced filling combines all the warm spices, and then some. It’s an easy twist on a classic that all pumpkin pie lovers can get with. For those stepping into this blind, here is a video and here is another pumpkin pie recipe to reference and keep you in check when pie-ing it up.
For this Halloween dessert, we’ve laid out detailed instructions for the dough. There are many techniques, ingredients, and ratios for any solid pie crust. This one works for us, we hope it works for you too. So don’t be a Halloweenie, and get to making this next Halloween dessert.
Pie Dough
- 2 tbsp Apple Cider Vinegar
- 6 tbsp Water
- 1 cup (8 oz) + 2 tbsp Unsalted Butter
- 2 ½ cups Flour
- 1 tsp Sugar
- 1 tsp Salt
- + Pie Pan
- + Baking Beans (any ole’ dried bean will work)
- + Parchment Paper
- At least 30 minutes before you begin making the dough, put the apple cider vinegar and water in the fridge to get it nice and cold.
- Grate the butter. Yes, with a cheese grater. Then immediately place in the fridge. You want the fat to be extra cold and firm so it doesn’t melt while handling the pie dough.
- While the butter is chilling, gather the dry ingredients. Measure and mix dry ingredients in a medium sized bowl.
- Remove apple cider vinegar, water, and butter from fridge after 15-20 minutes.
- In a medium bowl, add butter to the flour (not flour to butter, it won’t mix right this way, don’t ask why). Begin working the butter into the flour with your hands. If it gets too soft, pop it back in the fridge to firm back up. When it starts resembling pea sized crumbles, slowly add the vinegar/water mixture in small pours. You may not need it all. Use just enough to bring the dough together. Do your best to not overwork the dough. Option to dip your fingers in the water mixture instead of pouring, making sure to not add too much.
- The more you work it, the tougher and more dense it will become. We’re looking for a lightly handled, flaky dough. Sounds about right, yeah?!
- Once it is all well incorporated, form the dough into a ball then knead into a disc shape. Keep a lookout for dry dough, flour pockets, butter build ups, and small cracks.
- Wrap the dough disc in plastic wrap to prevent it from drying out.
- (This disc is good for a year in the freezer! Feel free to double this recipe and save half for your next pie venture.)
- The dough should rest in the fridge for at least an hour before handling again. Any longer is fine too.
- While waiting, clean up, plop on the couch with a handful of Halloween candy; you’ve earned it.
- After resting for an hour or more, pull the dough out and preheat your oven to 350°. Butter your pie pan and set aside.
- Flour your work surface and place the disk on the counter. Begin gently beating with your rolling pin to flatten the disk. This makes the dough pliable and begins stretching it out without melting the butter with your warm hands. Once flattened, begin rolling the dough out by starting in the center and rolling back and forth without going over the edge, just right up to it. This will keep the dough even throughout.
- Once about ⅛ in thick all the way through, roll onto the rolling pin and gently lay on top of the buttered pie pan. Gently press so it’s tightly formed to the pan. We’re looking for a one inch overhang of dough. Trim any excess off.
- Roll the overhang of dough under itself to puff up the edges. This ensures your pie mixture won’t jiggle it’s way over the crust and onto the oven floor when baking.
- To make crimped edges, use your right thumb to gently press the dough into your thumb and forefinger on the other hand. Crimp all the way around.
- Because your hands are warm and have softened the butter a bit, place the pie shell into the fridge for about 15 minutes to firm up those butter solids.
- Now time for the blind bake. Remove from fridge. Cover the dough with parchment paper and top with pie baking beans. (I’ve saved regular dried beans and reuse them for pies. AKA pie beans!) Be sure to get the beans in every nook and cranny of the dough to weigh it down and ensure flat, even cooking.
- Pop into a 350°F oven for ~25 minutes and cross your fingers!
- Once perfectly golden all the way around, remove from oven. Brush with egg whites to prevent the filling from seeping into the crust. Let cool. Whew, now onto the filling!
Chai Pumpkin Pie Filling
- 1 15 oz can of Libby’s Pumpkin Puree
- 2 Eggs
- ½ cup Sugar
- ½ cup Brown Sugar
- ½ cup Heavy cream
- 1 Tbsp Cornstarch
- 1 tsp Vanilla
- 1 tsp Cinnamon
- ½ tsp Ginger
- ¼ tsp Maca
- ¼ tsp Nutmeg
- ¼ tsp Cardamom
- ¼ tsp Clove
- ¼ tsp Black Pepper
- ½ tsp Salt
- Turn the oven down to 275°F.
- Mix the pumpkin and eggs in a medium bowl. Then add the sugars, cream, corn starch, and vanilla. Lastly, incorporate all the spices. Mix thoroughly.
- Once the pie shell is cooled, pour the filling into the shell. Bake in the oven for 45-50 mins.
- To know when it’s done, jiggle the pan and see if it firmed up in the heat. Any cracks on the surface are a good tell that it is definitely ready to cool off.
- Place on a wire rack.
- Let cool, slice, and finish it with maple whipped cream
Maple Whipped Cream
Using a hand or stand mixer, whisk 1/2 cup heavy cream, 1 tablespoon maples syrup and 1/4 teaspoon of vanilla until soft peaks are reached.
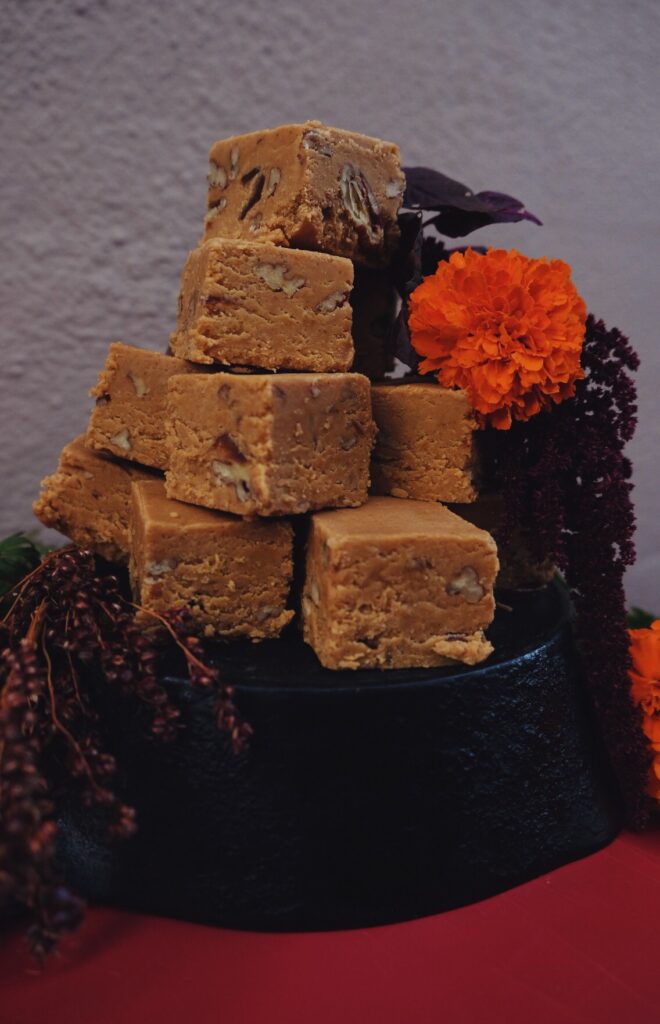
Pumpkin Tahini Date Fudge
Fudge will always be a classic holiday go-to. Whether it’s for Halloween desserts or Christmas gifts, fudge is a dependable option that’s hard not love. Working with hot sugar can be tricky, so here’s a few extra tips just in case. The last stop on our haunted Halloween dessert tour takes a twist on a classic. I’ve taken pumpkin fudge and added Obour’s Date Tahini for a toasted sweetener. This stuff is unBOOlievable- you’ll be spooning it straight out of the jar before you know it. Toss in some nuts and a splash of vanilla and you’ve got this year’s top Halloween dessert.
Pumpkin Tahini Date Fudge recipe
- 1 tbsp Butter or Cooking Spray
- 1 ¾ cup Sugar
- 1 ½ cup Brown Sugar
- ¼ cup Corn Syrup
- 1 5 oz can Evaporated Milk
- ½ cup + 3 tbsp Libby’s Canned Pumpkin
- ¾ cup Butter
- ¼ cup Obour Date Tahini
- 2 cups White Chocolate
- 3 Medjool Dates, pitted and diced
- 1 cup Pecans, toasted
- 1 tsp Vanilla
- ¼ tsp Cinnamon
- ½ tsp Salt
- Source a square pan 8 by 8 and cover with foil, making sure to form it into all four corners. Grease the foil with butter or cooking spray. Also grab a medium sized bowl and grease that too. Set both aside.
- Combine sugars, corn syrup, milk, pumpkin, butter, and date tahini in a medium pot.
- Bring up to a rolling boil. While continuously stirring to prevent sticking or scorching, watch the thermometer until it reaches 234°F, soft ball stage.
- Remove from heat and transfer mixture to the buttered bowl, but do not scrape the bottom of the pot. Using either a stand mixer or hand mixer, beat the fudge for 5 minutes until it loses its sheen and becomes more matte. It should hold its shape when dripped from a spoon or paddle attachment.
- Try not to overmix. As soon as it loses its sheen, quickly stir in the white chocolate, dates, pecans, cinnamon, vanilla, and salt until combined. Transfer to your prepared foil lined pan.
- Let cool on a wire rack to be sure there is airflow all the way around it.
- Cut into squares and get ready for trick-or-treaters to knock on your door!
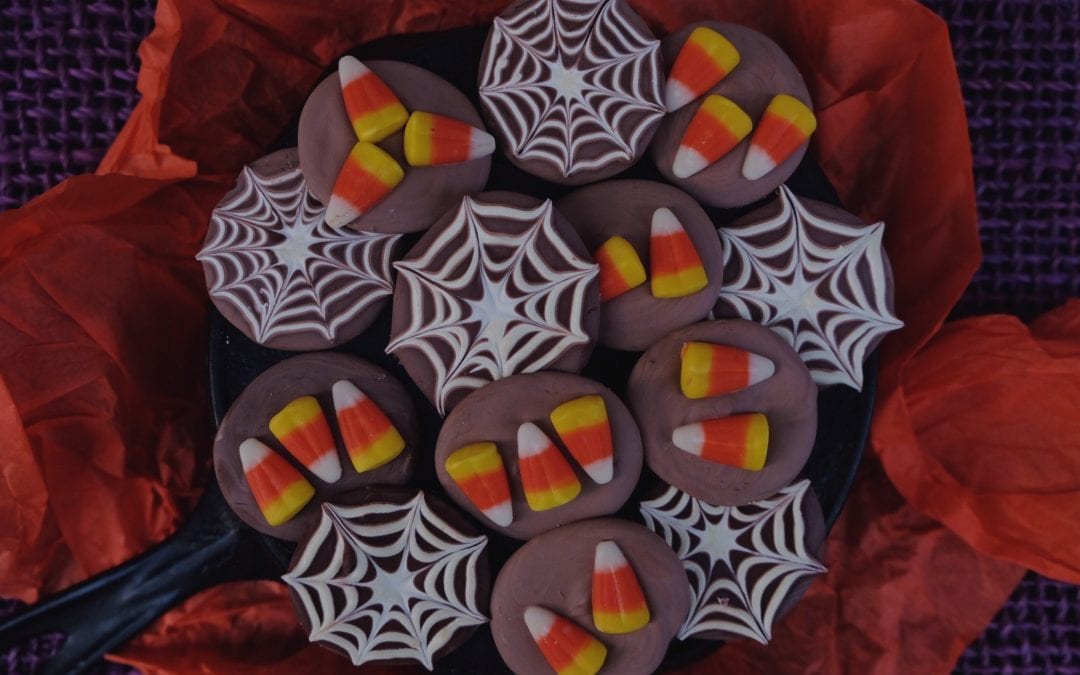
Halloween Mendiants
Mendiants are a classic French dessert made of chocolate and decorated with a variety of nuts and dried fruit. These are the gateway dessert to legitimate chocolate making. For those in a hurry or for those that aren’t baking savvy, this is the recipe for you. It’s as simple as melting chocolate, transfering to parchment, and decorating. Easiest Halloween dessert you’ll ever make!
When buying chocolate, be sure to buy baking chips. These melt very smoothly on their own and are easy to shape into the desired disc. Semi-sweet, milk, or dark chocolate will all work equally.
Here I’ve used candy corn and spiderweb technique, but use whatever creepy toppings you’d like to make this Halloween dessert your own. If you’ve got it, haunt it. Lolz

Halloween Mendiants Recipe
- 1 bag of Semi-Sweet Chocolate or Dark Chocolate Baking Chips
- 1 cup White Chocolate Baking Chips
- 1 Handful of Candy Corn
- Toothpicks
- *Use any cheesy, but classic, halloween candies/decoration
- Set up a baking sheet with parchment paper, set aside.
- Grab two bowls and a pot of water.
- To melt the chocolate, set up a medium pot with a few cups of water and bring to a boil. Place a metal or glass bowl on top. This is called a double broiler– it allows you to melt the chocolate with steam acting on your side to prevent scorched chocolate. If you never smelt burnt chocolate, let’s keep it that way with this technique (you’re welcome).
- Melt the milk chocolate until there are no solid chunks of chocolate left.
- Using the second bowl, melt the white chocolate. Feel free to alternate bowls over the same pot to keep each chocolate at a melty consistency.
- Using a pointed spoon, begin spooning the milk chocolate onto the parchment into discs. Gently swirl it around until even.
- Before it cools, add candy corn to each chocolate disk.
- For the spider web effect, you’ll need to make a pipette. Once made, spoon the white chocolate into the parchment cone. Carefully pipe a dot in the center of the brown disc. Then make about 3 thin white chocolate circles around the dot. Using a toothpick, start in the center and drag the toothpick towards the edge. Repeat 5-6 times until spider web aesthetic is achieved.
- Feel free to use any other Halloween candy or decor for this. The options are endless!
Happy Halloween from Stretchy Pants
And there you have it; we have exhausted the pumpkin Halloween dessert options. Now it’s time for you to get busy in the kitchen with these spooktacular Halloween desserts. ‘Tis the season of sharing candy with others, but do be sure to stash some for yourself. For, you know, after the holidays. Maybe some of these Halloween desserts will make way to friends so you can all eat, drink, and be scary together. #SquadGhouls
~Created and written by Chandler Henry